Category Archives: win10 path-variable

STARTING WITH PYTHON3 – The very beginning – part 2

Journal: uffmm.org,
ISSN 2567-6458, July 9, 2019
Email: info@uffmm.org
Author: Gerd Doeben-Henisch
Email:
gerd@doeben-henisch.de

CONTEXT

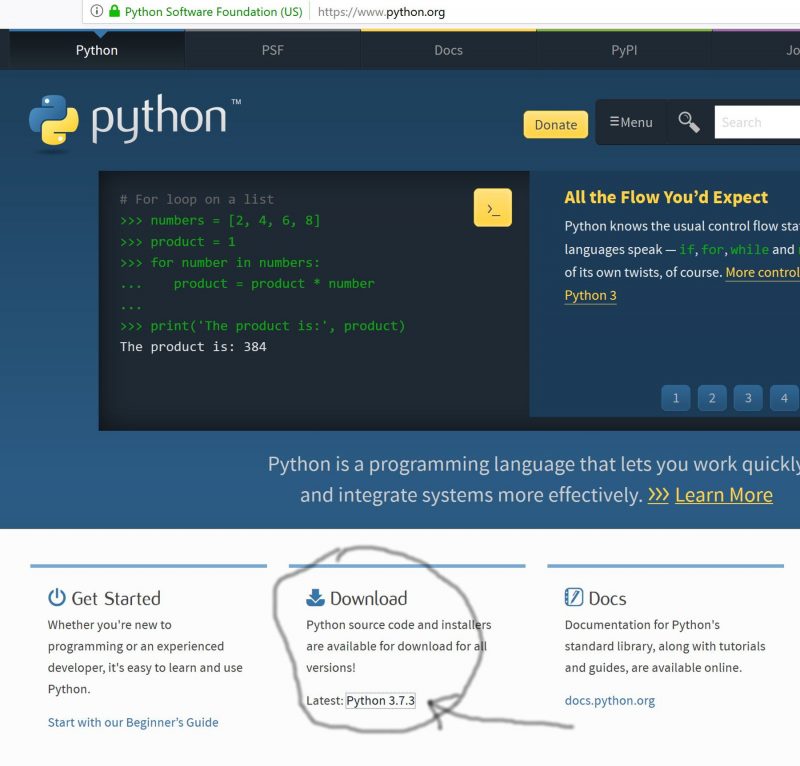
This is the next step in the python3 programming project. The first step can be found here. The overall context is still the python Co-Learning project.

PROGRAMMING TOOLS

First SW-tools to use for programming

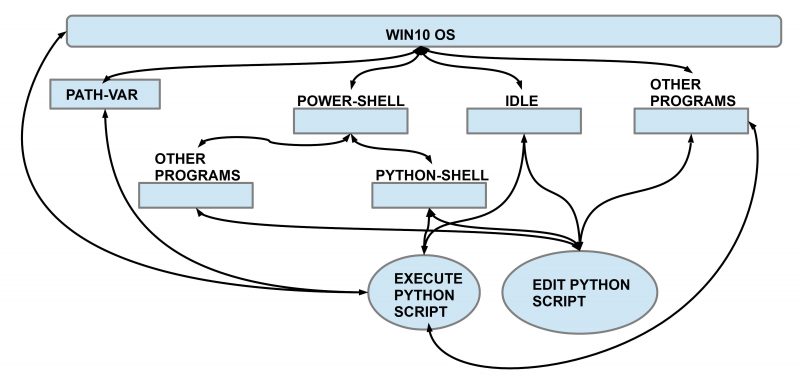
In this second session we extend the overview of the possible programming tools, how they are interrelated, and how they work.

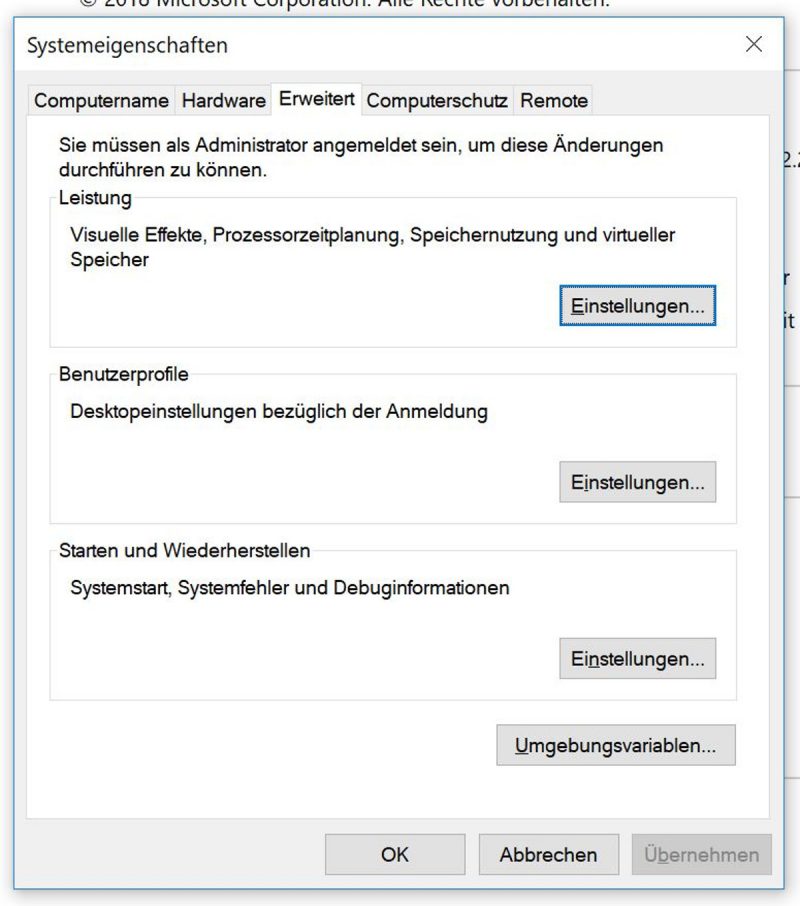
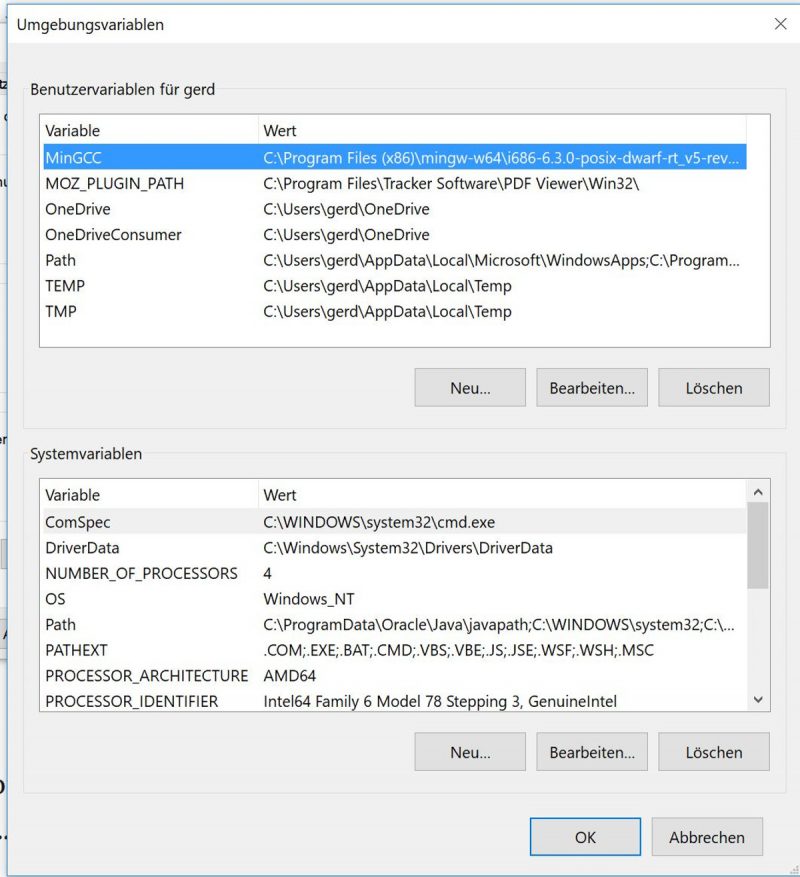
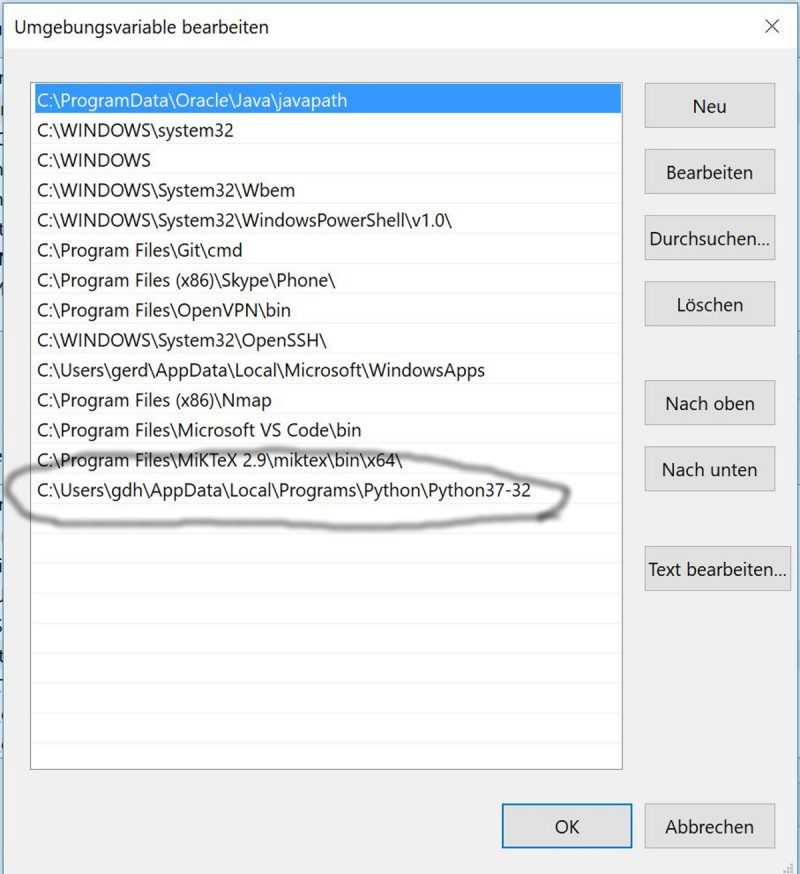
In the figure above you can see the windows 10 operating system as the root system for everything else. The win10 system communicates with the PATH-variable and uses this information for many operations. How on can edit this variable has been shown in the last session.

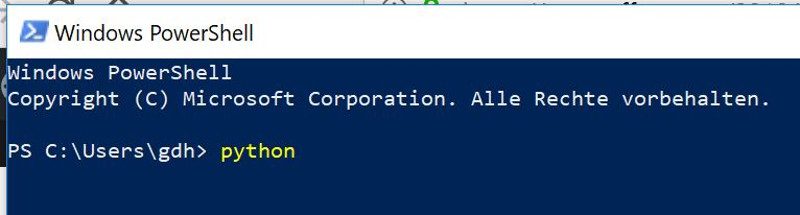
One can activate directly from the win10 system the power-shell with a command-line interface. Entering the right code one can activate from the power-shell either directly a python-shell for python commands or one can activate other programs like the editor ‘notepad’ or ‘notepad++’. With such editors one can edit python scripts, store them, and then run these scripts from the power-shell by calling a python-shell with these scripts as arguments (as shown in the first session).

The python shell allows the direct entering of python commands and gives immediately feedback whether it works and how. Therefore one calls this an interactive shell which is very handy to check quickly some commands and their effects.

Another tool, which we will use in this session, is the integrated script environment (IDLE). This is like the python-shell but with some additional functionalities (see below). The main usage is for editing larger python scripts with a built-in editor and for running these scripts.

THE IDLE TOOL

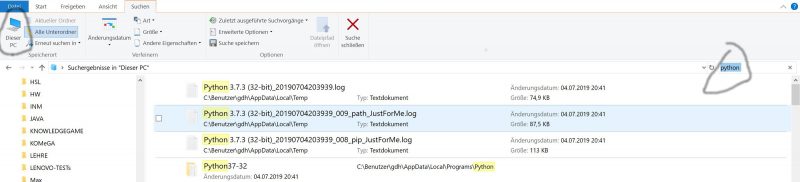
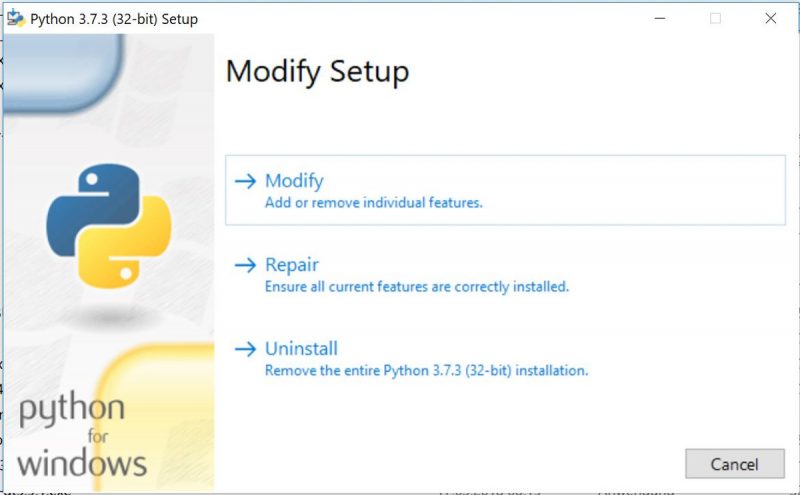
To use this new tool you can press the windows button to see the list of all apps (programs) available on your computer. Under ‘P’ you will find python 3.7.3 and within python you will find an entry for IDLE. By selecting this item and clicking on the right mouse-button you can select the option to attach this icon to the task bar. If it is there you can use it.

If you start the IDLE tool by clicking on the icon from the task bar it opens as a new python interactive shell with some more options.

A first thing you can do is to ask for the actual path you are in. For this you have to import the python module ‘os’ (operating system) and use the command ‘getcwd()‘ from this module. Entering ‘os.getcwd()‘ in the python command line generates the actual path as output on the next line.

>>> import os
>>> os.getcwd()
‘C:\\Users\\gerd_2\\AppData\\Local\\Programs\\Python\\Python37-32’
>>>

This reveals that the actual path is pointing to the location of the python exe module (on my pc). This is not what I want because I have created in the first session a folder with name ‘code’ in my home directory ‘\Users\gerd_2’. From inside of the IDLE tool it is not possible to change the actual path.  But python as language provides lots of options to do this. One option is described below:

The module os offers several functions. Besides the function ‘os.getcwd()’ which we have used already there is another command ‘os.chdir(pathname)‘. But to directly change the actual path one has to be cautious because the path ‘C:\\Users\gerd_2\code‘ includes the ‘\’-sign, this cannot be read directly by the os.chdir() command. You can surround this problem by using the ‘\’-sign twice: first as an ‘escape sign’ and then as the ‘object sign’, resulting in the following command format: ‘C:\\Users\\gerd_2\\code‘. Entering this nothing is given as a result, and when you repeat the question ‘os.getcwd()’ you will receive as new answer the new path. Here the dialog with the python-shell:

Python 3.7.3 (v3.7.3:ef4ec6ed12, Mar 25 2019, 21:26:53) [MSC v.1916 32 bit (Intel)] on win32

Type “help”, “copyright”, “credits” or “license()” for more information.

>>> import os

>>> os.getcwd()

‘C:\\Users\\gerd_2\\AppData\\Local\\Programs\\Python\\Python37-32’

>>> os.chdir(‘C:\\Users\\gerd_2\\code’)

>>> os.getcwd()

‘C:\\Users\\gerd_2\\code’

>>>

You can see that the python command ‘os.getcwd() has been used twice. If you want to repeat some command you can call-back the command history of the python-shell with the keystrokes ‘ALT+P‘. This recalls the past (P) of the command history.

Comment: In the command

>> os.chdir(‘C:\\Users\\gerd_2\\code’)

I have used the back-slash sign ‘\’ twice to make the string fit as argument for the ‘os.chdir()’ command. As one can learn does python allow another solution, which looks like this:

>> os.chdir(r’C:\Users\gerd_2\code’)

The solution is to use an additional ‘r’ directly before the string ‘…’ telling the python interpreter that the following string has to be understood as a raw string. This works, try it out 🙂

IDLE AND EXECUTION OF A SCRIPT

Now if we are in the target folder for my scripts we can look to all files which are in this folder actually. For this we can use the python command ‘os.listdir()’:

>>> os.listdir()

[‘savesrc.txt’, ‘script1.py’, ‘script1.pyw’, ‘script1b.py’, ‘showargs.py’, ‘threenames.py’, ‘tst1.py’, ‘what.py’, ‘what2.py’, ‘__pycache__’]

>>>

You can detect in this list the python script ‘scrpt1.py’. Entering the name of this script either with .py extension or without will not enable an execution:

>>> script1.py

Traceback (most recent call last):

File “<pyshell#6>”, line 1, in <module>

script1.py

NameError: name ‘script1’ is not defined

From the first session we know that we can start the script within the power-shell directly. For this we have to activate the powershell, have to go into the desired folder ‘code’ …

PS C:\Users\gerd_2> cd code

PS C:\Users\gerd_2\code> dir

Verzeichnis: C:\Users\gerd_2\code

Mode LastWriteTime Length Name

—- ————- —— —-

d—– 04.07.2019 19:03 __pycache__

-a—- 01.07.2019 18:44 182 savesrc.txt

-a—- 01.07.2019 18:41 92 script1.py

-a—- 24.06.2019 23:23 126 script1.pyw

-a—- 24.06.2019 22:43 128 script1b.py

-a—- 04.07.2019 18:51 56 showargs.py

-a—- 28.06.2019 00:29 162 threenames.py

-a—- 24.06.2019 21:16 120 tst1.py

-a—- 24.06.2019 22:49 126 what.py

-a—- 24.06.2019 23:56 136 what2.py

… and then we can start the python-script ‘script1.py’:

PS C:\Users\gerd_2\code> python script1.py

win32

1267650600228229401496703205376

pythonpythonpythonpythonpythonpythonpythonpython

PS C:\Users\gerd_2\code>

But because we will here use the IDLE tool we proceed differently. We open the File-Menue to get the desired file script1.py:

Open file-directory for file search

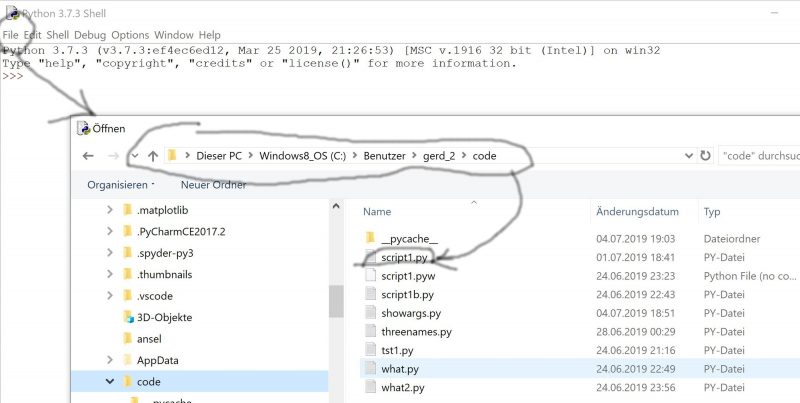
Then we load  the python-script script1.py in the editor of the IDLE tool:

The text of the script

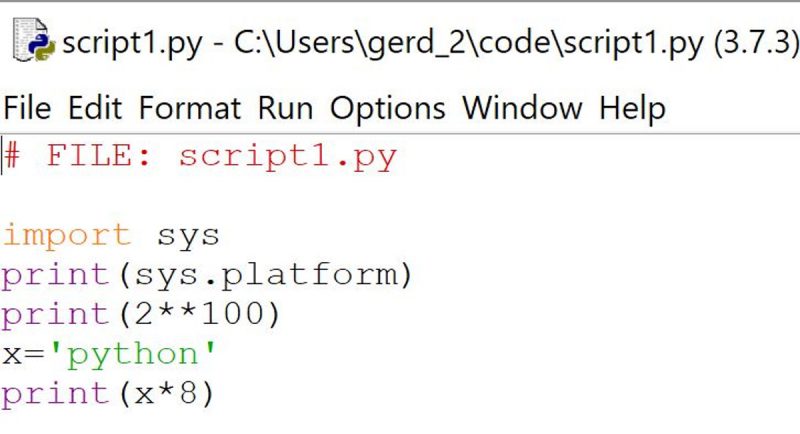
and then activate the RUN button for execution:

Activate the RUN button to execute the script

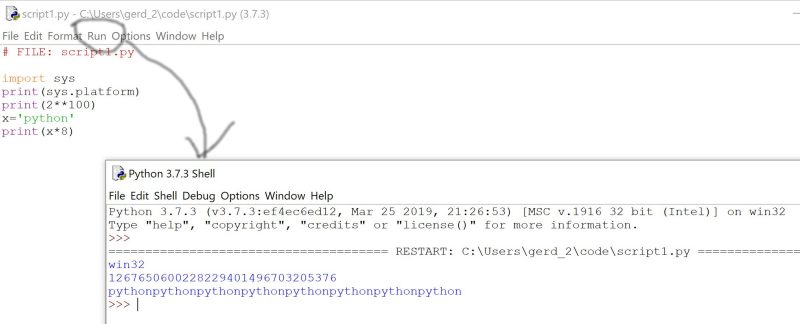
The script will then be executed and you will see the effect of the execution in the python shell. This looks the same as when you would have called the script within the power-shell calling  the python-shell.

There is still the other option to get the module running by the import command:

>>> import script1.py

win32

1267650600228229401496703205376

pythonpythonpythonpythonpythonpythonpythonpython

Traceback (most recent call last):

File “<pyshell#7>”, line 1, in <module>

import script1.py

ModuleNotFoundError: No module named ‘script1.py’; ‘script1’ is not a package

>>>

The import call works, but at the same time the python-shell states some error, that ‘script1.py’ is not recognized as a true module. This has to be clarified in the next session.

One possible continuation can be found HERE.


STARTING WITH PYTHON3 – The very beginning – V2

Journal: uffmm.org,
ISSN 2567-6458, July 5, 2019
Email: info@uffmm.org
Author: Gerd Doeben-Henisch
Email: gerd@doeben-henisch.de

CONTEXT

This is an update of the post ‘STARTING WITH PYTHON3 – The very beginning‘ from July-1, 2019. The original version was not ‘wrong’, but it seems, after a few days later, one can and should improve it. The main motivation for this new version is my experience as a linux programmer working with windows 10: learning by doing I detected a litle more radical approach to begin python programming with win10. This post is part of the overall  topic ‘Co-Learning with python 3‘.

OVERVIEW

In this updated version I will introduce some bits of the win10 environment which you will need for your python programming. Then I demonstrate the very first steps with some lines of code. Very important for all your own activities: in the beginning get you a helpful book to guide your start. After trying many sources I have actually the following recommendations:

  • Mark Lutz, Learn Python, 2013,5th ed.,Sebastopol (CA), O’Reilly
  • To get the sources: https://www.python.org/
  • Documentation: https://docs.python.org/3/
  • Python Software Foundation (PSF): https://www.python.org/psf-landing/
  • Python Community: https://www.python.org/community/

THE WIN10-ENVIRONMENT

When you start programming  you need a direct knowledge about your computing environment, in that case the win10 operating system. While linux is built up with an open mind and tries to make everything transparent, win10 is somehow the opposite: it is a closed box, and to work with it in direct contact with the operating system is not very well supported. Thus to work as a programmer with win10 is not what you ideally want. But now we are there and have to get the programming done.

After my first expriments with win10 I detected the following tools as very helpful to start programming: (i) The editor for the system and environment variables and (ii) the powershell. These tools allow you to define the operating system environment for your python programming  in a minimal way.

The editing of the system and environment variables you can reach by the following key-operations:

Editing System and Environment Variables

  1. Hit the windows key together with the key for ‘R’
  2. This opens a small window with a textfield-entry.
  3. In this field you enter the string ‘control’
  4. This opens a page with different topics for to manipulate some aspects of your system (because my computer is in the German-Mode I have the heading ‘Einstellungen des Computers ändern’, something like ‘Change options of the computer’).
  5. Here you select the topic ‘System and Security’
  6. Then another page opens with several topics, one is ‘System’, which you should select.
  7. On this new page you can see at the left border some more topics. The last one mentions something like ‘Extended System Options’. Select this
  8. Before you see the next page you will be asked to enter the Super-User Password. Thus you must be super-user to do this.  To be a real programmer you must have this rights to get a full understanding of what is going on.
  9. Then  the editor for system and environment variables pops up:
Editor for system and enviroment variables


  1. The interesting button is in the right down corner, in German: Umgebungsvariablen (‘environment variables’)
  2. Click this button and you will finally see the editor you are looking for:
Finally the editor to edit private and environment variables
  1. For the upcoming actions we need only the path-variable. One can highlight the Path-entry and select it with ‘Editing’ (German: ‘Bearbeiten’):
The window showing all the entries of the path-variable.
  1. Now you can see all the entries of the path variable nicely ordered one after the  other. This is a special service because the path-variable as such (as you will see later when using the power-shell) is one string. Here this string is splitted up into the different sub-strings. This allow you to add some new string or — also very important — to delete a substring. As You can see in the figure there is as last line an entry including the name Python . This line is the whole directory path on the drive C:\ where my actual python version is stored.

CLEAN UP BEFORE

Now, if You know where and how you can edit the basic system variables it can be a good idea to clean up the whole system with regard to older python installations. In my case I had tried  before — as a complete newbie — several python distributions like WinPython and Anaconda in different versions at different locations in the system, this accompanied with different installations of the python language. You can imagine that this caused finally some confusion what is where and what is causing which  effect.

Thus I decided to start from scratch, removing all the old stuff to get a ‘point zero’ for beginning.

The first step was to use the win10 explorer program with the find option in the small text-field up right.

Part of the win10-explorer window showing a find-operation on the whole PC

After you have entered your search-string, in this case ‘python’, you have to say (left up corner) the region, in which you want the search to happen. I have selected the whole PC.

After some while you see all locations as a complete path where the search-string python could be found. When I started my clean-up action there where lots of locations with different python installations, now there is only one left, which I am actually using.

But caution: If you want to delete the old installations you have (i) to look to the uninstall options/ programs to activate these to remove all stuff; (ii) finally you have to enter the editor for system and environment variables (see above) to delete all entries there, which are now obsolet.

GET YOUR PYTHON

Now, if you have set everything with Python to zero get your python version from the python home page: https://www.python.org/.

This page is a bit confusing. Stay cool. You can detect a field with the header Downloads and a hint to the latest version. In this case it shows 3.7.3. Click this.

Python Home Page for Downloads

The next page is completely confusing. The interesting part of this page is somewhere in the middle listing the different download files:

List of download files

We are interested in the 32-Bit version although I am working on a 64-Bit machine. For the learning the 32-Bit version is more flexibel and completely sufficient.

If you click the windows installer for python (second line from below) then a download notice will be shown asking for confirmation:

Confirm download of python installer

Select ‘datei speichern’ (download file) and the installer will be  loaded in your download directory.

In the list of files you can also see   a colum with the MD5-Checksum. This is an offer to check whether the file you have downloaded is indeed not corrupted in some way (viruses etc.) To use the MD5-Checksum code You need a MD5-software tool. I found a good description at this site: https://www.it-administrator.de/downloads/software/197801/, which points you to the following product page: https://www.novirusthanks.org/products/md5-checksum-tool/.

This looks quite OK. But if you want to apply it you have to surround some difficulties when you try to search for your file to check with the directory browser. In my case it shows the directory of the super-user first. To get my python download file I have to select the main drive C:\, there I have to select from Users my actual role as user gdh, and then I can find my download folder with the python exe file to be checked. From the web site with the files list I have copied the MD5-Checksum:

MD5-checksum tool at work

Luckily the check looks good. This encourages to install python 3.7.3 by clicking on the python installer.

Python Installer Window

Because I have already installe python I can only modify it or repair or uninstall. If you click it the first time you will be able to select the option Install. In that case it will propose a directory and it will install python. Before You say Yes You can also click the flag ‘Set Path Variable‘. I did this but the interesting point is that it had no effect when using the power shell (see below). Only when I added the path again with the aid of the powershell it took effect.

USING THE POWERSHELL

To get the powershell you have to press the windows button, then a list of Apps (programs) appears. Under the letter ‘W’ you see the windows powershell. Clicking this topic you will detect several versions of the power shell: 64-Bit and 32-Bit (indicated by (x86)), and the old standard version as well as a more enhanced version called integrated script environment (ISE).

I have started with the old, simple standard version. By right-clicking with your mouse you can add the option to attach the powershell to the task bar which makes it easy to call it up again later.

Section of my task bar including icons for normal powershell (left) and integrated script environment (right)

If you click on the powershell icon the powershell window will open:

Powershell window with the command python entered

If you would confirm this command by pressing the enter key — and you would not have set the path variable with the path of the python executing modul python.exe before — then there would appear a message that the command ‘python’ is not known (I cannot demonstrate it here because I have set the path variable on account of this message meanwhile).

There exists a workaround without setting the path variable explicitly by give the whole path of the python modul, like this:

Powershell calling python with explicit path

You see, this works fine. To make life easier I have set the environment path variable with this python execution path. Then you can enter the command python alone and a python environement opens up.

But, wait a moment. Setting the path variable with the editor for the environment variable alone (see above) this has no effect for the powershell! Also the powershell can show the content of the path-variable correctly:

Powershell showing content of path-variable

(This is the version of the path variable after I have added the path with the powershell too!)

To add the path variable for the python modul explicitly in the powershell you can enter the following  command:

PS C:\Users\gdh> $Env:PATH +=”;C:\Users\gdh\AppData\Local\Programs\Python\Python37-32″

When I did this everything worked fine. Don’t ask, why it didn’t work before with the editing of the environment variable PATH alone.  This is at a first glance like ‘Software mystik’. With much more time for research there exists perhaps an explanation. My first guess would be, that the communication between the powershell and the environment variable has some hidden factors. For more very detailed explanations about the powershell and the editing of the environment variable you can find a good document from microsoft here: https://docs.microsoft.com/en-us/powershell/module/microsoft.powershell.core/about/about_environment_variables?view=powershell-6.

PROGRAMMING PYTHON

For first programming steps look to the first version of this post beginning at the header FIRST PROGRAMMING STEPS somewhere in the middle of the page.

More coding will follow soon.